Still no answer? You should contact us, but there is also a legacy FAQ if you want to keep searching.
You can’t select the wrong download since you’ll always end up with the edition of Process Lasso appropriate for your operating system. The installer automatically detects and downloads the correct edition. Process Lasso Server Edition will always install on all Windows Server operating systems, and Process Lasso (standard edition) will install on Windows 10. The only time you need to worry about which installer to use if you are using the silent install capabilities. For individual installer downloads see this page.
Note that the installer itself is 32-bit in all cases, but installs 64-bit components as appropriate.
Workstation: Windows 7, 8, 10, 11.
Server: Windows 2008r2, 2016, 2019, 2022.
Memory and disk requirements are negligible.
![]() For Windows workstations such as Windows 10, please buy a Workstation license.
For Windows workstations such as Windows 10, please buy a Workstation license.
![]() For Windows Servers, such as Windows 2019, please buy a Server license.
For Windows Servers, such as Windows 2019, please buy a Server license.
No. Process Lasso does not system modifications that persist after it is uninstalled.
Pretty free! Please see this page.
Open your Process Lasso GUI, navigate to the Help menu and select ‘Activate this software’. Paste your license activation key (see Order History to find yours) into the dialog. Then click ‘Activate now‘.
If you do not see options to Activate, then the product is already activated. You can confirm in the Help/About dialog.


Yes, and now more than ever given the increase in CPU core counts!
The automation, process rules, persistent settings (e.g. CPU affinities), and various algorithms like the Instance Balancer, CPU Limiter, and IdleSaver are of unquestionable utility.
Our famous ProBalance algorithm that helps preserve system responsiveness during high loads is useful to prevent lags and even complete system stalls, as demonstrated here. Even in the unlikely case that your software environment is already so well-behaved that ProBalance is rarely necessary, it is not harmful and good to have monitoring the system in case a problematic scenario emerges, such as a background application consuming excess CPU cycles.
Finally, for PCs (workstations), our Performance Mode (aka Bitsum Highest Performance power plan) can provide a boost to performance by dynamically disabling power saving functions of the CPU. The dynamic part is important, as it can be automatically toggled on when your games or performance-critical applications are run!
NO! The ProBalance feature doesn’t actually ‘restrain’ anything. We used that term only for lack of a better one. ProBalance’s default action is to simply temporarily lower the offending process’s priority class to Below Normal, a marginal change to the precedence during contention. In real-world and synthetic tests, as shown in the CPUEater demo, this is all it takes to restore responsiveness to the rest of the PC, and it certainly doesn’t impact the performance of targeted applications.
There is no perfect answer to your question. The defaults settings are the most tested and should work best for most people. In general, ProBalance has to be a little aggressive to hit processes *before* they cause a responsiveness problem. This aggressiveness is not an issue since the marginal adjustment it makes to priority classes doesn’t have any negative impact. It won’t slow a process down, for instance. The priority class only ever matters if there is a lot of contention for the CPU. So ProBalance acts as a bit of a safety in case the system, or some other application, needs to get a few CPU cycles to remain responsive but otherwise wouldn’t have been to.
Practically speaking, if you want to try additional tuning you will need to experiment with changes to see if you find some that work better for you.
On servers, this warning is best resolved by simply setting the Process Lasso GUI to not auto-start for all users. The GUI (ProcessLasso.exe) hosts the system tray icon and main window of Process Lasso. It does not need to be running. The separate Governor (core engine) will enforce all rules in the background regardless. The GUI can then be opened manually when needed, or auto-started only for administrators.
Use the menu item ‘Options / General / Reconfigure the way Process Lasso Starts‘ to change the GUI auto-start to only your administrative user, or none:
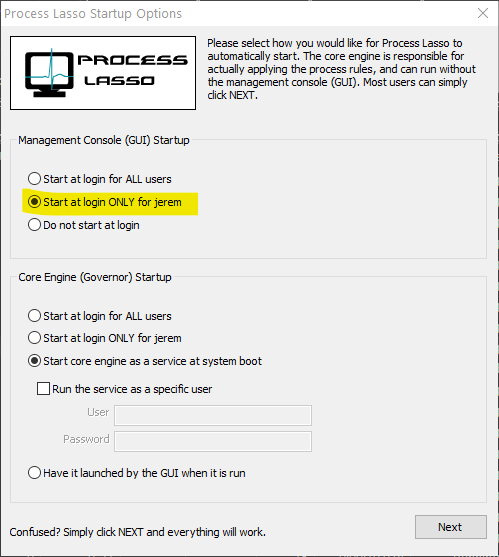
Change Process Lasso GUI auto-start type
This warning is normally seen when a person is running Process Lasso as Limited (Standard) User, but has opted to start the Governor as a service. In that scenario, the user should consider changing the configuration and log paths to something under their user directory. This can be done via ‘Options / General settings / Reconfigure the way Process Lasso starts’. See screenshot below.
Note that for multi-user systems, changing the path to a user folder is not recommended since other users won’t be able to write to it. Instead, when a configuration change is necessary, a user can fully close and re-launch Process Lasso manually, as an administrator. When started manually, there will be a prompt for administrative credentials. Entering those will start the Process Lasso GUI elevated, and thus it will be able to edit the configuration file during that instance.
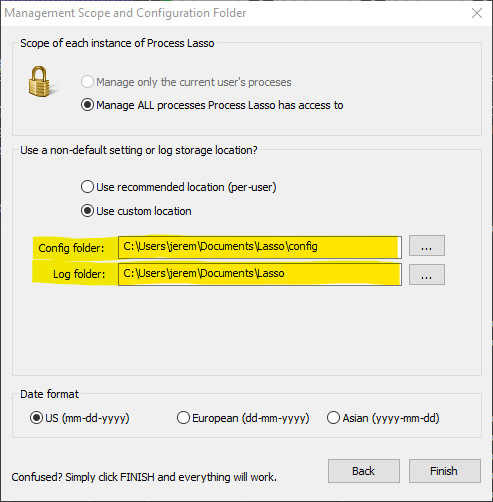
Process Lasso config and log storage in user folder
Full warning text: “WARNING: The configuration file is not writable. Please check the path via ‘Options / General / Reconfigure the Way Process Lasso Starts’.”
Please see this page for a complete description of all system tray icons.
See this link for all Process Lasso features.
First, remember that you don’t need to understand or use all the advanced features of Process Lasso. You can simply install it and forget it. ProBalance and Performance Mode work out of the box.
That said, we do offer:
CPUBalance – is a simpler rendition of Process Lasso focused on ProBalance only.
ParkControl – Includes the Bitsum Highest Performance power plan, some power plan automation such as Dynamic Boost (similar to IdleSaver), and other features.
The ProBalance algorithm is designed in such a way that it will never degrade your system performance, only improve it.
It is extremely conservative. For instance, one of it’s many criteria (by default) is a process must be of normal priority class. Most audio apps set themselves to a High priority class. Thus, this exclusion was added, as it is assumed the application that sets it’s own priority class knows best.
Worst case if ProBalance did take action on some important process, you can always exclude it, but I very rarely hear of this due to the built-in exclusions and conservative nature.
Absolutely NOT. Do not do this. ProBalance will handle priority class adjustments that are necessary, if any are. Most of the time it will take no action since it is designed to be conservative and has numerous criteria that must be met before it ever makes a marginal, temporary change to a background process’s priority class.
Users should not try to rank processes in importance to them or make too many tweaks to process priority classes! You will do more harm than good.
I recommend leaving ProBalance enabled so it can act on any background processes that interfere with your real-time apps.
You likely won’t even have to manually exclude important processes from ProBalance, as it will ignore processes with a non-normal priority by default, among other conservative settings.
Also be sure you are using Performance Mode, or are otherwise in performance-centric power plan like Bitsum Highest Performance.
As for specific priority classes or CPU affinities, the optimal settings vary, so you’ll have to experiment.
Limiting memory use is difficult and requires Watchdog rules to restart or terminate offending processes when they exceed a threshold. Forcibly denying them allocation requests would cause them to simply crash. In some cases, slowing them down by constraining their CPU affinity (e.g. CPU limiter) can also reduce the rate of memory consumption.
Of course, users can ‘trim’ the virtual memory of a process, but that isn’t going to be effective if the virtual memory is actively referenced since it will just get paged right back in as soon as it is referenced. This is usually not a good idea since Windows will page out seldom referenced virtual memory anyway.
To do this requires forcibly shutting down applications in that user session when the memory threshold is exceeded.
It is possible using Watchdog rules, but these would be specific to each process (rather than cumulative for the entire session). You could create a rule, for instance, that would terminate any process in a user session ‘Bob’ when it exceeded a virtual memory limit.
The match string might look like:
winword.exe:bob
Wildcards, or even Regular Expressions, can be used like:
win*.exe:bo*
However, you should be as selective as possible when creating match strings.
The resulting Watchdog entry might look like below.
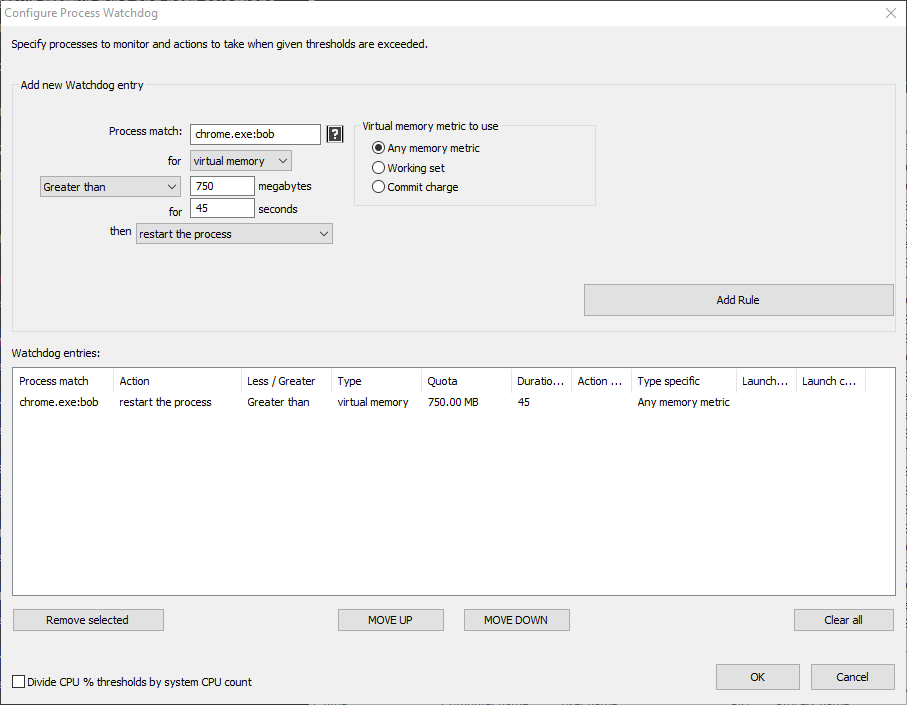
Watchdog Memory Limit Rule for instances of Chrome.exe and user ‘Bob’
First, let us be sure your expectations are correct – no product is a panacea for all system problems, and certainly not all use cases benefit equally from Process Lasso’s automated tuning. However, ProBalance does always keep you protected from that ‘worst case’ scenario, which you may encounter at some point, and it will save you from an improper shutdown.
ProBalance also does not act just to pretend to be doing something. It acts only when necessary. So if you are barely taxing your system, you aren’t going to see much difference in responsiveness. However, during times when you have your CPU loaded up, you will see a dramatic increase in responsiveness if the problem is CPU bound and ProBalance is able to cope with it. Sometimes the issue is I/O related, like waiting for a hard drive, but when it is CPU related, ProBalance addresses it.
This is well demonstrated by real-world and synthetic demos like our CPUEater Demo. I recommend that you read and try the CPUEater Demo yourself to see the impact. There is no trick here. You can recreate the demo in any language with a simple infinite loop (and nothing else!). See this page for more information on ProBalance …
Note that the Automation Features are ‘utility features’, so if you need them, then you need them. They don’t relate to this answer.
A single thread can’t be externally split into multiple threads, thus you can’t force use of unused CPU or GPU cores. You could force that single thread to be swapped between the CPU cores, but that would only decrease performance due to the switches, and have the same total CPU utilization.
The application has to be programmed to utilize multiple threads in order to make use of all cores. So you might say, “Ok, then why didn’t they do that?”. Well, some actions are linear in nature. In fact, many are. For instance, if I’m adding 2+2=4, it’s really hard to break that up into multiple threads.
The same goes for use of the GPU. The application has to be programmed to use it, you can’t force it to change it’s characteristics later.
This is why the performance of individual CPU cores still matters. If you have single-threaded CPU bound load, you can have 256 CPU cores, but only 1 will be utilized, and it’s individual performance will be the system max.
First, make sure they are enabled in the View menu (if Process Lasso). Second, make sure you have the right bit-size. This may require a product reinstall. Otherwise, your performance counters are in some way corrupted and there is little else that can be done. The command ‘lodctr.exe /r’ is run for you to try to repair this condition if Lasso finds it to be the case, so all that can be done is done.
Process Lasso is great for games and other applications that need close to real-time performance.
Performance Mode (formerly Gaming Mode) configures ProBalance and the system power plan in such a way as to be best equipped to run games or other resource intensive applications.
For the most part, Performance Mode is simply the engagement of BHP (or other specified power plan). However, Performance Mode also interacts with other features that have options that disable or change their behavior when Performance Mode is engaged. Finally, Performance Mode creates a more simplified user experience. Certainly you can ignore Performance Mode and use the ‘application power profiles’.
Process Lasso’s Keep Awake works by issuing a power subsystem API call to inform the system that activity is still occurring. It does NOT do any ‘dirty hack’ like emulate keyboard input, as such is not necessary. It will issue this call once a minute at minimum, more if required.
The number of CPU cores an application uses is limited by how multi-threaded it is (or isn’t). This is not something that can be fixed by Process Lasso, or any other external actor. Increasing parallelism (multi-threadedness) requires a change to the programming of applications, and even then it is not always possible.
No, it is not included, and yes, they are designed to run together.
Basically, ParkControl Pro has features not present in Process Lasso, such as a dynamically changing system tray icon that reflects core parking status. Going forward, there will be more differences.
They are designed to work along-side each other, so when ParkControl Pro is installed, Process Lasso’s ‘Core parking’ tool will actually just open ParkControl Pro’s window. This can lead to the perception that it is ‘within’ Process Lasso, but the only thing within Process Lasso is a more limited rendition of ParkControl (no Pro).
In some cases, yes, but it depends on your reason, and you need to be smart about it.
If your goal is increased performance, remember that the Windows OS CPU Scheduler tries to manage which threads are on what cores itself, and it’s not dumb. So, when you micro-manage CPU affinities, you are second-guessing it. This can only be appropriate when you are certain of what the loads are going to be and know what you’re doing.
If your goal is to limit CPU use, then you can do so by giving a problematic process access to only a limited subset of available cores. However, you must be sure that this process isn’t ‘blocking’, meaning slowing it doesn’t slow something else, or even everything else. Similarly, you obviously must be willing to tolerate the proportional decrease in that application’s performance.
We do not recommend limiting the CPU affinities of ALL processes with a broad all-inclusive rule. We also don’t recommend limiting the CPU affinity of system or security software since their components may be I/O blocking (halting execution of other apps or services until scans are complete).
In short, try to be conservative and precise when creating rules so that there are fewer unintended consequences.
We do not recommend imprecise rules. Rules should be targeted so they don’t inadvertently impact other processes or subsystems.
Generally, system services and processes should have maximum latitude to be scheduled (no constraints). While some adjustments could be beneficial, I discourage haphazard tweaking of system processes, and warn that there could be unintended consequences that aren’t immediately apparent.
In practice, it probably rarely matters unless you have particularly constraining CPU affinity rules. If you’ve discovered a set of rules that work for you, then you should keep using them.
There is no special setup, just install and go. I will note that we now have CPUBalance as well – which is ProBalance isolated from the other features. For many audio users, especially those who already have optimized PCs and don’t need all that Lasso offers, this may be the preferred solution. Read at https://bitsum.com/cpubalance/ .
Probably not. The best practice is to approach it from the other direction – lowering priority classes of anything that might interfere with your application(s).
Generally, you should simply let Process Lasso’s ProBalance dynamically lower the priority class of problematic background processes. You can also manually lower the priorities of processes that could interfere with your application.
This approach of lowering priorities is much more effective than raising the priority class of your desired application. In fact, setting a ‘High’ priority class normally doesn’t yield any advantage in performance.
It is also best to let ProBalance do it’s thing rather than make too many custom tweaks to prioity classes. Too many custom tweaks may cause complications.
Keep this in mind as well:
It is the amount of free RAM that contains system cache data. The Task Manager also shows this.
No, it won’t be able to directly impact the System process. That is a special process for critical system operations, mostly involving memory management.
It is not normal for the System process to consistently consume a large amount of CPU.
Users will discover that the CPU load seen there is a symptom of a problem, not the problem itself.
How is your RAM load? Do you have a lot of paging activity? Have you reset your Windows installation to eliminate the possibility of persistent malware?
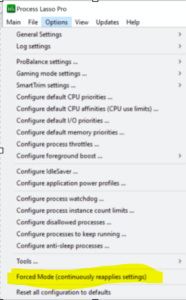
Some processes change their own CPU affinities, or are acted on by another application. In these cases, you need to turn on ‘Forced Mode’ at the bottom of the Options menu. This causes Process Lasso to continuously re-apply process rules. Without this setting, Process Lasso defers to whatever else is acting on the application.
Yes. Process Lasso has a ‘hard throttling’ feature buried in (Options / CPU / More), but we don’t recommend using it. Instead, Process Lasso’s CPU Limiter or constrained CPU affinities are a superior solution whenever possible.
If you do use hard throttling, the feature periodically suspends threads of target processes to forcibly limit their CPU consumption.
Security (anti-malware) applications protect their processes from modification so that malware can’t impact them. This limits Process Lasso’s visibility into them.
Further, adjustments to real-time scanning components can have undesired effects on performance since they block calls from other applications until scans are complete.
No, they won’t conflict. You can use them together without complications since they do different things.
High DPI support was hacked onto Windows after-the-fact. Thus not all applications, including Process Lasso, are designed to take advantage of it. That means these apps must be scaled up to the higher DPI by the system. If they weren’t scaled, they would appear super tiny.
Normally the default system scaling is perfectly fine for Process Lasso. If your text is noticeably blurry, something is set wrong. You should experiment with various scaling options, either for the system (‘Change the size of text, apps and other items’) or per-application by right-clicking on the Process Lasso shortcut, selecting ‘Properties’, compatibility tab, then clicking the ‘Change high DPI settings’ button.
Why don’t all apps just become High DPI aware? Because it is a ton of work, depending on the application. Process Lasso has graphs and a lot of custom drawing that all would need refactored. And Process Lasso, as a utility, isn’t something most people interact with so frequently that high DPI awareness is mission critical.
While Performance Mode (BHP power plan) may improve FPS in games, it will likely not matter if your system is already well-tuned.
However, the ProBalance feature will help to prevent background processes from interfering with your game performance. Since this can happen intermittently, it can’t be easily quantified in simple FPS benchmarks, but you definitely want it active to protect you when background processes do interfere.
You can create one by:
1. Find the Process Lasso shortcut by typing ‘Process Lasso’ in the Start menu, then right-clicking it and selecting ‘Open file location’. It is normally in “C:\ProgramData\Microsoft\Windows\Start Menu\Programs\Process Lasso”
2. Right-click on the shortcut file and select ‘Properties’, then ‘Shortcut’ tab. There you can assign any key combination to it via the ‘Shortcut key’ field.
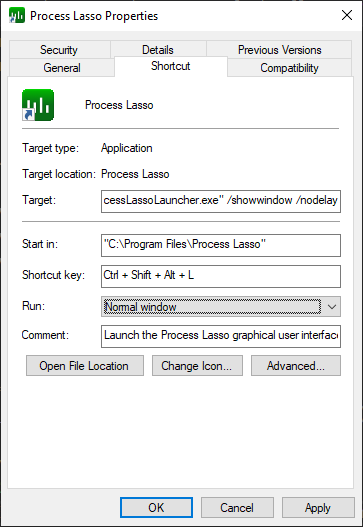
Process Lasso Keyboard Shortcut
In the case of conflicting power rules (two or more running processes with distinct power plan settings), the most recent launched will generally take precedence, but that behavior is not guaranteed. Such rules should be avoided.
To accomplish this, a Persistent (Always) CPU Affinity rule can be set in ‘Options / CPU / Configure Persistent CPU Affinities‘. While you can match to a large set of processes using a broad wildcard or Regular Expression, we recommend being as selective as possible since system processes should generally have unrestricted choice of CPUs. Thus, one would want to set rules matching specifically to target application(s).
Artificially spreading a software thread across multiple CPU cores would substantially slow down execution, due to the context switches. Seeing individual CPU cores spike is appropriate, and why single-threaded performance is a critical CPU performance metric.
Process Lasso’s Instance Balancer does exactly that. See ‘Options / CPU / Configure Instance Balancer‘ and this post for more info.
You generally don’t need ParkControl when you have Process Lasso. The only exception is if you want to use ParkControl to tweak your power plan settings, but in such a case can install (or open) it as-needed. The Bitsum Highest Performance power plan is in both products and fully disables CPU core parking and below-base frequency scaling.
The Processor Group Extender may be of utility on the AMD Threadripper 3990x, but should only be used in specific situations where an application needs additional CPU cores, but is not processor group aware. Otherwise, general features of Process Lasso such as ProBalance, Performance Mode, and process rules still apply to the 3990x. CorePrio does NOT apply to the 3990x, it is specific to the 2990wx.
A change to your display brightness is caused by the switch of the active power profile.
To fix it, you need to adjust the brightness for the power profile ‘Bitsum Highest Performance’, and any others you may use, to match your desired settings. To do this, go to the Windows ‘Power and sleep settings’, then click ‘Additional power settings’, then change the power profile settings as desired (you may have to click ‘show additional plans’).
No! We value your privacy and data. Process Lasso doesn’t report any user or process data back to Bitsum. There is not even any application telemetry. The only connection to Bitsum servers occurs to activate or verify a license, and to check for updates.
The Process Lasso GUI consumes negligible resources when it is minimized. When visible, it does consume a small amount of CPU resources to keep the display updated. Users can reduce this CPU use by decreasing the refresh rate of the GUI via ‘Options / General settings / Refresh interval (GUI)’. For example, changing it to 2 seconds from the default of 1 second would reduce CPU consumption by half.
Remember, the Process Lasso GUI (ProcessLasso.exe) can also be closed entirely and the core engine (ProcessGovernor.exe) will continue to enforce process rules non-interactively in the background.
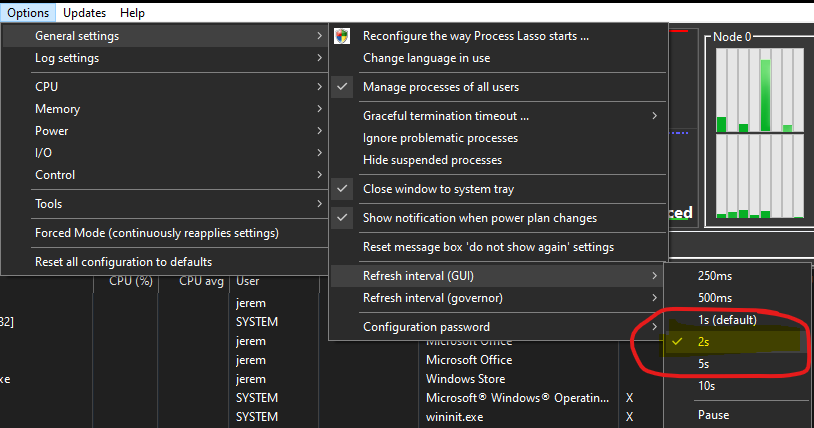
Process Lasso GUI refresh rate adjustment
Users may wish to also check ‘View / Effects / Disable progress bar themes‘. However, again, this only matters when the GUI main window is visible.
Except for special situations such as a CPU with more than 64 threads, this particular scenario isn’t something that can be addressed externally. It is a limitation in how multi-threaded an application is. Many tasks are inherently single-threaded, so the application developer is not always able to make full use of available CPU cores.
Process Lasso can still be beneficial though. Its ProBalance algorithm can help preserve system responsiveness during high loads and prevent interference in game play. Other features, such as power profile automation, may also be useful.
That said, the Instance Balancer can help distribute the CPU load resulting from multiple instances of an application, and the Group Extender can help group unaware applications make full use of the CPU (for use when there are more than 64 logical CPU cores, resulting in more than one processor group).
(1) The CPU Limiter feature allows you to set rules that will limit a process’s CPU consumption by dynamically constraining its CPU affinity (set of CPU cores it can use). For any hard limits on CPU use, this is recommended. Rules are fairly robust. Please see this page for more information. See this page for more info.
(2) The ProBalance algorithm is quite effective at improving responsiveness during high CPU loads. See this page for more info.
(3) Persistent CPU affinity and process priority class rules will enable you a greater degree of control of the allocation of CPU resources.
We recommend giving Process Lasso Server Edition a try! Download from here.
We don’t know whether specific adjustments to CPU affinity or other settings will achieve your goals. As an application developer, we only strive to enable users full control over their running processes. When general optimizations are known and possible, algorithms like ProBalance were created. Therefore, the general guidance is to simply install Process Lasso and use its ProBalance. Performance Mode is also immediately useful for systems that don’t already have tuned power profiles, or where automatic switching to a higher performance power profile is desirable.
We advise to precisely target process settings and limit the number of rules. For instance, trying to micro-manage all process CPU affinities probably isn’t a good strategy — though it might work. In most cases, it is best to give the system leeway to schedule threads on whatever CPU cores it deems appropriate. A better strategy might be to constrain the CPU affinity of a problematic background process, or constrain the CPU affinity of a game to a specific set of CPU cores. However, again, we can’t say whether any specific adjustment will work to achieve your goal.
Process Lasso has the capability of disabling SMT or Hyper-Threading on a per-process basis. To accomplish this, it uses a staggered CPU affinity so that only distinct physical CPU cores are available to target processes.
Since the nature of SMT is to share computational units of a single physical CPU core between 2 logical CPU cores, some workloads may perform better when their threads are placed on distinct physical cores. This eliminates the potential of contention for those shared computational units. However, the OS does already make an effort to schedule threads on distinct physical cores, so this additional constraint of disabling SMT may not be necessary.
We have no data on what specific loads (apps/games) and hardware that disabling SMT is beneficial on.
The only way to deal with it is to create a Watchdog rule to terminate or restart the offending process when its memory grows beyond a certain threshold.
Use of the page file, even when RAM is available, is not necessarily bad, and generally should not be interfered with. We recommend use of the Windows Resource Monitor to check how many hard page faults actually occur (swap-in operations). If this number is not excessive, then you should not be concerned about Windows use of the page file. In any event, this is not something Process Lasso can assist you with.
Reducing the Governor or GUI refresh rate will make them respond faster to changes in system conditions, but will use more CPU cycles. The default value of 1 second is recommended.
CPU core parking is controlled by the settings of the power profile you are in. Process Lasso doesn’t take any direct control over this, it only has the capacity to disable CPU core parking by use of the Bitsum Highest Performance power profile (aka Performance Mode). This capability is not available on systems that have locked-down power profiles, and so only offer a Balanced option. In those cases, use the Battery Icon in the system tray to adjust performance characteristics.
If your system does have ‘open’ power profiles, use the Performance Mode of Process Lasso to disable CPU core parking when important applications are running. To do this, right-click on your target application’s process, then select ‘Induce Performance Mode’.
You can close the Process Lasso GUI/app, so long as you leave the core engine service (processgovernor.exe) running. You will be asked about this when you exit Process Lasso. If you don’t see the message box shown below when you exit, try resetting saved ‘do not show again’ settings via the menu item ‘Options / General / Reset Do Not Show Again Memory’.
Option 1
Option 2
Right-click on a system process, such as wininit.exe, and select ‘Application Power Profile / Balanced‘. This will cause the system to effectively have a ‘base’ power profile.
The Dynamic Thread Priority Boost provides a brief additional priority boost when a thread is awoken from a wait state. So, for instance, when an app becomes active, it has a tiny short-lived boost in priority. This is an addition to the longer-term foreground boosts that Windows already provides, or that Process Lasso’s Foreground Boost would extend. The Dynamic Thread Priority Boost setting is enabled for all processes by default, and it should usually stay that way.
Still no answer? You should contact us, but there is also a legacy FAQ if you want to keep searching.