WL-530GPage Type: ArticleEdit this page (last editedJuly 24, 2008) Bookmarks1: Bitsum | Wiki | Frontpage | RecentChanges | TitleIndex | CategoryIndex | UserPreferences | FindPage | HelpPage | SandBox » Welcome » WL-530G
Quick downloadsLiberated Libertas FirmwareIf you like this project, or would like to help in development, I'd love to hear from you. Please visit the forum at [ Custom Firmwares Forum].
Changes from stock firmware 1.9.4.6: Custom Firmwares Forum].
Changes from stock firmware 1.9.4.6:
Liberated Libertas Downloads'Please understand that this is a beta test. Builds marked FINAL are considered to be stable and ready for use by the general end user population. By downloading beta firmwares you understand that you are part of a beta test, meaning that you may encounter bugs and should report those bugs so that they can be fixed by the next non-beta release. '' 'USE AT YOUR OWN RISK.' These builds are just my daily snapshots, some of which may have bugs. In a unlikely worst case scenario, you will simply need to use rescue mode to flash a new firmware. So, your device should be completely safe from permanent harm, but for legal reasons I can not make any warranties to that effect. You use at your own risk. By downloading these firmwares you acknowledge and agree that you are using this firmware at your own risk and will not hold any other parties, including the author(s) and distributor(s) of this firmware liable for damages, tangible or intanglible, resulting from the use or misue of this firmware. No warranties are made of any kind. IMPORANT NOTICE ABOUT A PROBLEM: People have reported that in the later builds often times dhcpd fails to load due to a lack of contiguous free memory. This will result in the router not automatically assigning IP addersses. Try the 9/24 or 9/22 build, they may do better. I will update the latest build eventually. LATEST: [Download firmware] (always points to newest build)09/26/06: [ Download firmware] - 09/24/06: [ Download firmware] - Milestone 1 - FINAL09/23/06: [ Download firmware] - Milestone 1 Release Candidate 209/22/06: [ Download firmware] - Milestone 1 Release Candidate 109/20/06: [ Download firmware]09/19/06: [ Download firmware]09/17/06: [ Download firmware]09/16/06: [ Download firmware]09/15/06: [ Download firmware]09/13/06: [ Download firmware]09/12/06: [ Download firmware]09/10/06: [ Download firmware]09/08/06: [ Download firmware]09/06/06: [ Download firmware]09/03/06: [ Download firmware]09/01/06: [ Download firmware]- Older downloads removed - Using the Liberated Libertas Firmware (User Guide)See Liberated Libertas User Guide.Project hostingThe buildroot is a mess right now and there is SO much left to do.. so,so much. Join the effort. The project is hosted here: https://developer.berlios.de/projects/wl530g/.Following svn repository commit logsYou can see what we have been up to lately by checking the list at: https://lists.berlios.de/mailman/listinfo/wl530g-svncheckins You can sign up, or just watch the archives.Other editionsStock vendor firmware 1.9.4.6 with telnetd enabled (no other changes): [Download]
Project goals
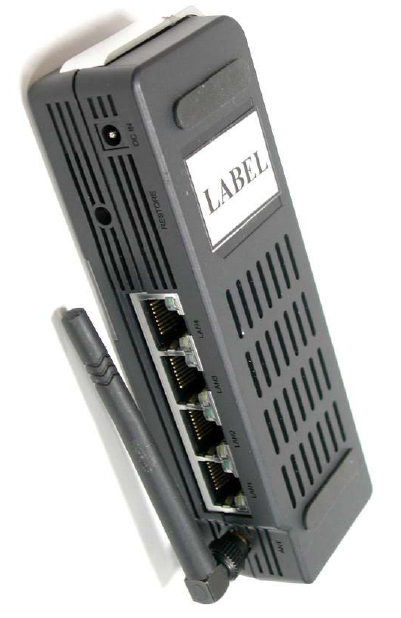
WL-530G OverviewThis pocket router is an excellent device for hacking. It's capable, small, efficient, and has vendor supplied GPL linux sources. As you read through this wiki, you will notice other than the hardware differences, it's not at all an unfamaliar set up. It uses a tuple based pseudo-NVRAM configuration system with many variables named exactly like those common on BCM947xx devices. This is good for easily portability of management consoles (i.e. HTTP based) for for BCM947xx devices. The biggest limitation of this device is that it doesn't have an MMU. This means that not everything will run ok without modifications, and what does run may run sub-optimally. The community should thank Dan Flett for sending me a WL530-G to work on and soliciting this project. Were it not for him whatever progress this project makes would not have been made. As always, it's a community working cooperatively together that makes progress. For every accomplishment that is made there are countless unseen individuals who contribute to it.PicturesThese are from the FCC submission, so are a development unit and may have very minor differences from the production unit: EXTERNAL FRONT: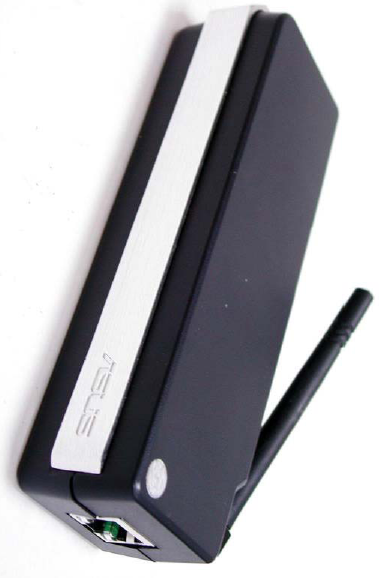 EXTERNAL BACK:
HardwareOpening the unitFirst things first ;). Let's pop this sucker open. It's not as hard as it might appear at first. Unfortunately, it takes much more time to put back together ;p. To take apart:
Board: Marvell Libertas AP22V2Board: AP22V2ROM: 4MB RAM: 16MB System-on-a-chip: Marvell 88W8510-BAN (Access Point/Gateway? SoC?) [ Product brochure]Ethernet switch: Marvell 88E6060 [ Product borchure]System-on-a-chip: Marvell 88W8510System-on-a-chip: Marvell Libertas SOHO AP/Gateway? (8W8510-BAN) [Product brochure]CPU (in the 888510): ARM Arm946id(wb) rev 1 (v4l) at 160mhz (~88 BogoMips?) /> cat /proc/cpuinfo Processor : ARM Arm946id(wb) rev 1 (v4l) BogoMIPS : 87.85 Hardware : MV88W85x0 ... Ethernet switchEthernet switch: Marvell Link Street (88E6060) SOHO Switch [Product borchure]Power: 5V ~2A - can be powered over USB 2The power adaptor supplies 5V @2A. I have seen reports that it can successfully be powered over USB 2 with an appropriate adaptor. [http://www.google.com/search?q=ADP-AP-06] looks like it but this adapter is untested.
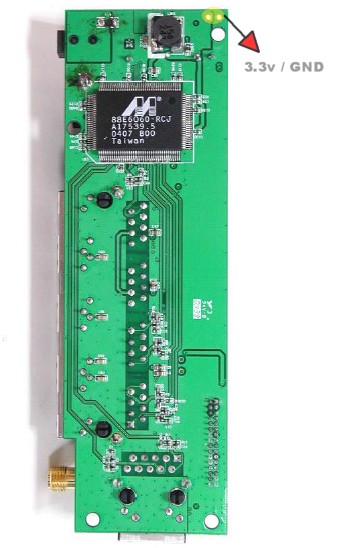
ROM: 4MBTotal size: 4MB (32Mbit)Chip(s): MX 29LV320*-TC90 Data sheet: To link.. RAM: 16MBTotal size: 16MB (128Mbit)Chip(s): SAMSUNG K4S641632H-TC60 x 2 Data sheet: http://tinyurl.com/gsmb6 Serial and JTAGSpecial thanks Johan Ronkainen (jr) for a lot of assistance in this matter. He bought a WL-530g and was able to positively determine the serial ports. Once he let me know for sure where they were, I was able to get my serial console working. The serial (TTL) and JTAG connectors are on small little test points beside the CPU. They are very hard to get to while the unit is running. Be careful when installing a serial port. Very careful. SERIAL AND JTAG CONNECTORS: NOTE: This is a snippet of the FCC photo, not my unit. Hence, you see the soldering 'burns' on the development unit and the PCB differes slightly from the final pruduction design.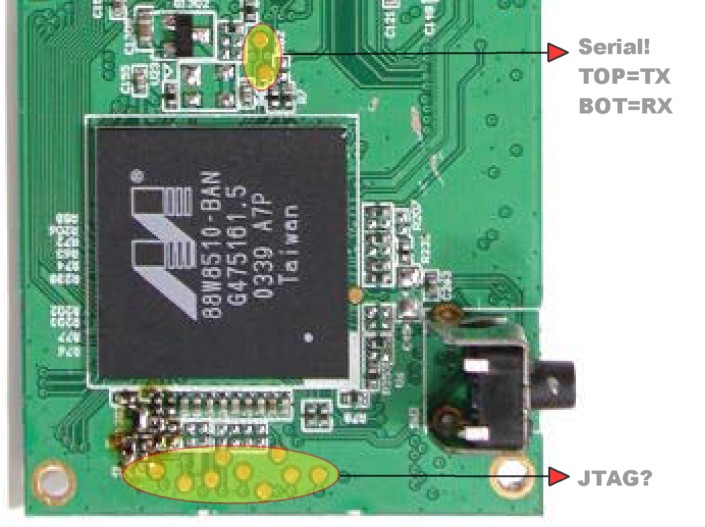 You of course also need +3.3v and a GND to get the serial ports working. There's an excellent connector for these on the edge of the switch/LAN part of the PCB:
 Of course, you'll need to use an RS232<->TTL chip/cable (typical in cell phone serial cables, and used on almost all embedded devices). This is because the serial port on the router is running at 3.3v, but the serial port on your PC is running at a higher voltage. Not using this chip may fry your router.
TIP: To test your RS232<->TTL cable simply hook the RX to TX and type something (make sure flow control is off). If you see what you typed, then it's working. If not, then it's not. Thanks Johan Ronkainen (jr).
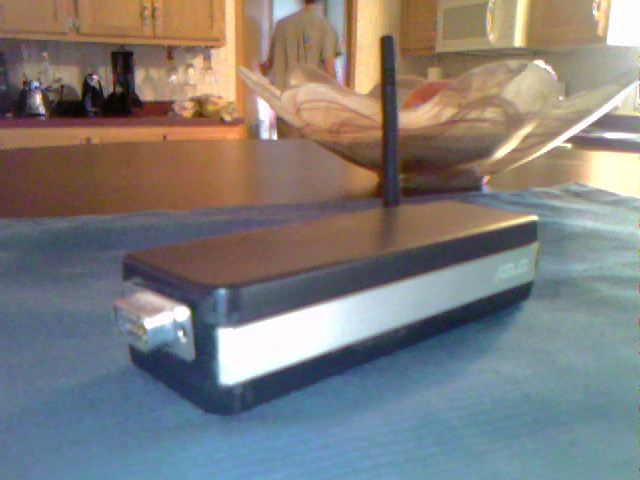
Here's an example of how I implemented an external D-SUB 9-pin connector:
Of course, you'll need to use an RS232<->TTL chip/cable (typical in cell phone serial cables, and used on almost all embedded devices). This is because the serial port on the router is running at 3.3v, but the serial port on your PC is running at a higher voltage. Not using this chip may fry your router.
TIP: To test your RS232<->TTL cable simply hook the RX to TX and type something (make sure flow control is off). If you see what you typed, then it's working. If not, then it's not. Thanks Johan Ronkainen (jr).
Here's an example of how I implemented an external D-SUB 9-pin connector:
LEDsThe board supports two sets of 3 LEDs (one on each side of the 'top'). However, only one set is implemented (actually has LEDs), and since the case doesn't have a window for the other 3 LEDs, you couldn't see them anyway. And the LEDs implemented are ...
Creating custom firmwaresCaveats of an MMU-less systemFirst, you should famalarize with the rules of an MMU-less system. Every instance of an application requires the entire application be loaded again into RAM, so shared libraries or multi-binary (combined) executables like Busybox have to be used with care. XIP can avoid this, but obviously uses ROM space. Applications can not use fork. There is a vfork substitution, but due to the reasons above, it's not nearly as efficient as a true fork on a system with an MMU. The uClinux patches must be applied to the Linux kernel, as it is designed to run on an MMU-less system.Compiling for this boardThe uClinux-dist build root is used to build user applications and the system kernel. It makes this process very easy, and the Firmware Modification Kit makes building firmware images even easier.Building the kernel
Building applications/packages or adding new ones
Modifying vendor firmware images (extract, change, rebuild)To add or remove packages or make configuration changes to the firmware is simple. It involves simply extracting the firmware image, making changes, then building a new firmware image. I've now made my [Firmware Modification Kit] compatible with WL530g images (presumably also WL520g and WL550g as well).
Follow the instructions in the kit to extract a vendor firmware image, update it with your own files, then rebuild it. It's only one step to extract and one step to rebuild.
[UTIL] asustrx: update to add -b parameterThis is an update to the open source asustrx utility that adds the '-b' parameter to start segments at a specific offset, padding up until that point. This is done by ASUS. I believe it may be necessary due to the lack of an MMU. [ASUSTRX v0.90] - Update to asustrx utility that adds the "-b" switch to force segment offets.
Firmware image formatThe firmware images are a standard ASUS style TRX with an 'addver' style header appended. They expect to have two segments with the file system image starting at 0xA0000 (hence the -b addition to the asustrx utility). 0x00000 ^^ TRX Header0x00020 ^^ Segment1: Kernel 0xA0000 ^^ Segment2: cramfs file system 0x????? ^^ addver style header to indicate version of the firmware Changing any NVRAM variable via HTTP management consoleThis is really unnecessary since using the techniques I've shown you can re-enable telnetd on vendor supplied firmware images and thus use the nvram console mode utility. Or, you can just download the telnet enabled images I've already created ;). You can change any NVRAM variable you wish by using the configuration backup/restore functionality. Simply perform a backup, then use a hex editor to modify the variables you wish. Note that this is a NULL terminated array of ASCIIZ strings. Do not edit it if you don't understand how this works (basically, a NULL terminates a string and two NULLs terminate the array). If anyone wants, maybe I'll write a simple conversion tool to translate it to plain text and back. If you get the idea of changing telnet_enabled, it won't work to re-enable telnet on ASUS firmwares where it's been disabled.Boot loader: ARMBOOTThe full source code to the boot loader is included in the ASUS GPL sources. The release notes label it as "ARMboot for "AP22V2 Ver 1.42". Curiously, the boot loader looks like it is made to be buildable under CYGWIN. This is surely a refreshing sight for all you Windows users (which include me). I may work with it under CYGWIN just because the Windows users are so often neglected in the OSS world. However, since a JTAG interface hasn't been documented yet on this device it's a risky move to flash a new boot loader.Rescue mode (debricking and alternate firmware flash)Rescue mode allows you to flash a new firmware image regardless of whatever state your current firmware image (kernel) is in. It is facilitated by the boot loader, which runs a TFTP server. It should allow you to easily downgrade to an older firmware without having to edit the addver header at the end of the firmware image. To enter rescue mode:
ASUS firmware technical detailsThe vendor firmware is pretty functional, but its HTTP management console has perhaps the ugliest color scheme ever invented. The same firmware sources are used for the WL-520/530/550/600 so you'll see things like webcam management and USB printer support scattered throughout.Operational detailsTelnetd: Now you see it, now you don't...Firmware versions 1.8.x.x have telnetd enabled. Newer builds (like 1.9.x.x) have disabled telnetd. To re-enable it using the above procedure, simply extract the firmware, uncomment out the telnet line in etc/inetd.conf, then rebuild the firmware image.Technical detailsKernel: uClinux 2.4.22kernel: linux 2.4Linux version 2.4.22-uc0 (root@localhost.localdomain) (gcc version 2.95.3 20010315 (release) (ColdFire patches - 20010318 from http://fiddes.net/coldfire/) uClinux XIP and shared lib patches from http://www.snapgear.com/)) #1369 Wed Aug 18 21:32:58 CDT 2004 Boot messagesSee appendix.File systems: CRAMFS, RAMFS, JFFS2As typical, it has a large RO file system and uses a ramdisk for one-session writable storage. A JFFS2 filesystem driver is incldued in the kernel and an area is reserved for it in the flash ROM mapping. HOWEVER, this area is instead used for nvram storage by default, not utilizing the JFFS2 driver at all. The custom firmware I've written changes this, so that the nvram storage actually uses the JFFS2 file system./> cat /proc/mounts rootfs / rootfs rw 0 0 /dev/root / cramfs ro 0 0 proc /proc proc rw 0 0 ramfs /tmp ramfs rw 0 0 Persistent configuration storage: NVRAMThis device uses a standard tuple (name=value) based emulated NVRAM area on the flash ROM chip. The NVRAM can be accessed by the user in the with an nvram tool that works the same as what we've seen before on the BCM947xx. Some interesting things you may notice is:
Shell: SashSash command shell (version 1.1.1). Sucks, at least in the state they have it.Busybox utilitiesThe vendor firmware uses Busybox v0.60.4 with only the most minimal of shell utilities linked in./> busybox
BusyBox v0.60.4 (2004.06.01-23:28+0000) multi-call binary
Usage: busybox [function] [arguments]...
or: [function] [arguments]...
BusyBox is a multi-call binary that combines many common Unix
utilities into a single executable. Most people will create a
link to busybox for each function they wish to use, and BusyBox
will act like whatever it was invoked as.
Currently defined functions:
busybox, cat, cp, du, echo, env, false, hostname, ifconfig, insmod,
kill, killall, klogd, logread, ls, lsmod, mkdir, mount, nslookup,
ping, ps, reboot, rm, rmmod, route, sleep, syslogd, traceroute,
true, umount, which
HTTP management consoleThis console seems pretty capable, but damn it's got to be the ugliest color scheme I've ever seen in my life. The author was clearly either color blind or otherwise not inclined towards visual design (I empathize, I'm not good with aesthetics either..). QOS isn't available on the router with the vendor firmware, but they've at least started to add it with a series of nvram variables and the following web page, which you can browse to manually: Advanced_QOS_Content.asp (i.e. http://192.168.1.1/Advanced_QOS_Content.asp)External Links[ FCC external images] - FCC pictures of the outside of the submitted unit.
[ FCC internal images] - FCC pictures of the inside of the submitted unit.
Pictures of similar units:
[Similar unit 1]
[Similar unit 2]
[Similar unit 3]
[Similar unit 4]
ContactsIf you have further information or want to contribute to this project, please email jeremy@bitsum.com . Feel free to edit this wiki when appropriate.AppendixWL-530g Boot Messages, Filesystem Dumps, and MoreSummary : WL-530g: Research and Development
|